Guide 04 Light
How to light a portrait with whatever light is there
Window, cloud, shade, low sun and street lamps: where to put the person, and starting settings for each.
You don't need a flash to make good environmental portraits. Most of the best ones use whatever light was already in the room or on the street. The trick is to stop thinking of light as a quantity (is there enough?) and start looking at its direction and size. Once you see where the light comes from, you can move the person, or yourself, until it falls on the face the way you want.
Direction first
Look at your subject's face and ask where the brightest side is. Then turn them, or walk around them, and watch how the shadows change. Four positions cover almost everything.
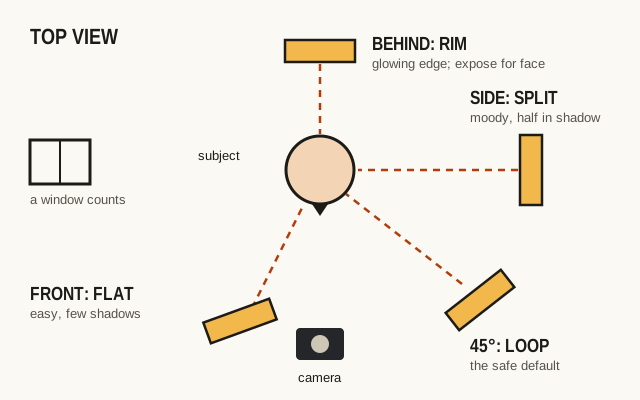
Light from the front, behind the camera, is flat. It hides texture and wrinkles, which some people like, but faces lose their shape.
Light from about 45 degrees to one side is the safe default. One cheek gets a small triangle or loop of shadow under the nose, and the face looks three-dimensional. If you're unsure, start here.
Light from the side splits the face into a lit half and a dark half. It's dramatic and works for a strong character portrait, less so for a friendly profile picture.
Light from behind wraps the hair and shoulders in a bright edge. You have to expose for the face, which means the background will get bright, and you'll often want something to bounce light back into the face.
Size matters as much as direction
A large light source close to someone gives soft shadows with gradual edges. A small or distant source gives hard, crisp shadows. A big window is large; the midday sun is small, even though it's huge, because it's so far away. Clouds turn the whole sky into one enormous soft light.
So if the light is too harsh, look for a way to make it bigger: move into the shade, stand them near a big window instead of a small one, or wait for a cloud.
Window light
Indoors, a window is the best light you have. Put your subject within a meter or two of it, angled so the window is to one side and slightly in front of them. Turn off the ceiling lights. Overhead bulbs mix a warmer color with the daylight and cast unflattering shadows under the eyes.
A north-facing window (in the northern hemisphere) gives soft light all day. A sunny window gives hard light with bright patches on the floor; hang a thin white curtain or sheet over it to soften it.
The side of the face away from the window will be dark. That's often good. If it's too dark, put something light on that side: a white wall, a sheet of paper, a pillowcase.
Overcast days and open shade
A cloudy sky is the easiest outdoor light. It's soft, even and forgiving. The downside is that it can look flat, with light falling on everything equally. Give the face some shape by putting something dark on one side. A doorway, a dark wall or a tree blocks light from that direction, and the face gains a shadow side.
Open shade is the same trick on a sunny day. Stand your subject just inside the shadow of a building, facing the bright, open part of the street. The light on their face comes from the sky, not the sun, so it is soft, and their eyes pick up a bright catchlight.
Golden hour
The hour or so after sunrise and before sunset gives low, warm, directional light. It's beautiful and it changes fast, so set up before it peaks.
With the sun to the side, you get warm light with long shadows. With the sun behind your subject, you get a glowing rim around hair and shoulders; expose for the face, and accept that the sky will be bright. Don't point people straight into the low sun unless you want squinting.
Night and street light
At night, the light is wherever the city puts it: shop windows, signs, street lamps, the glow from a bus shelter. Walk your subject around until one of these falls on the face. A brightly lit shop window is often the best source on the street. It's big, it's at face height and it's soft.
Colors at night are mixed: orange sodium lamps, white LEDs, colored neon. That can be part of the look. In the edit, aim for skin that looks believable rather than perfectly neutral.
Exposure is the challenge. Use your widest aperture, keep the shutter fast enough to freeze small movements, and let ISO climb. Modern cameras and phones handle noise far better than motion blur.
Starting settings
These are starting points for a camera in aperture priority with auto ISO. Check the histogram or the preview and adjust.
| Light | Aperture | Shutter | ISO |
|---|---|---|---|
| Window light | f/2 to f/4 | 1/125 to 1/250 s | 400 to 1600 |
| Overcast or open shade | f/2.8 to f/5.6 | 1/250 to 1/500 s | 200 to 800 |
| Golden hour | f/2 to f/4 | 1/250 to 1/1000 s | 100 to 400 |
| Night, street light | f/1.4 to f/2.8 | 1/60 to 1/160 s | 1600 to 6400 |
For the wide environmental frame, stop down a little (f/4 to f/8 in daylight) so the setting stays readable. For candid moments, raise the shutter speed to 1/250 s or faster. A simple rule for handheld shots is to keep the shutter at least as fast as one over twice your focal length, so 1/100 s for a 50mm lens.
On a phone, you won't set these numbers directly. Tap the face to focus, then drag the exposure slider down a little, since phones tend to brighten faces too much. The phone guide covers the rest.
When there isn't enough light
Sometimes there's no good light anywhere. Before reaching for a flash, try moving: nearer the window, to the doorway, to the lit side of the street. If you have to use the room's lights, turn off all but one lamp and use it like a window, from the side. And if all else fails, make the portrait about the place and its gloom, with the person in silhouette against the one bright thing in the room. That can be the strongest frame of the day.
Questions
Where should the window be for a window-light portrait?
To one side of the subject and a little in front, roughly 45 degrees from the direction they are facing. Keep them within a couple of meters of the glass, and turn off overhead lights so the color stays clean.
Do I need a reflector?
It helps but is not necessary. A white wall, a sheet of paper, a newspaper or a light-colored shirt can bounce enough light into the shadow side of a face. The point is to soften the shadows, not to remove them.