Guide 06 Editing
How to edit portraits so they still look like the person
A seven-step order of work that keeps skin, color and the place believable.
The aim of editing an environmental portrait is modest: make the picture look the way the scene felt, and keep the person looking like themselves. That rules out a lot of what editing apps push at you, like heavy presets, skin smoothing and dramatic skies. It leaves a short list of adjustments that do most of the work.
The order below works in Lightroom, Capture One, Darktable, Snapseed, the built-in editors on iPhone and Android, or almost anything else. The names of the sliders change, but the order of work matters more than the app.
1. Straighten and crop
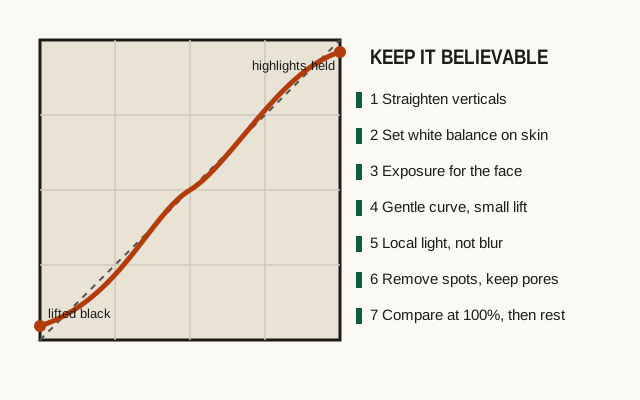
Start with geometry. In environmental portraits, door frames, shelves and windows are everywhere, and when they lean, the whole picture feels off. Use the straighten tool on a vertical line near the center of the frame, or the automatic upright or perspective tool if your editor has one. Then crop.
Cropping is where you fix the corners you missed while shooting: a bright exit sign, half a stranger, a power cord. Keep the person away from the very edge of the frame, and don't crop at joints like wrists, elbows or knees, which looks like an amputation.
If you plan to post on X, try a 4:5 vertical crop and a 16:9 horizontal crop. You don't need to pick yet.
2. White balance on skin
Correct color before brightness, because color casts change how bright things look. Use the eyedropper on something neutral if the frame has it: a gray wall, a white shirt in shade. Then judge the skin. The goal is skin that looks healthy and believable in that light, not perfectly neutral. Window light can stay slightly cool; golden hour should stay warm.
Mixed light (a warm lamp on one side, a blue window on the other) can't be fully fixed with a global slider. Choose the one that falls on the face and fix for that. A local adjustment can then warm or cool the other area a little.
3. Exposure for the face
Set overall exposure so the face looks right, even if a window or the sky goes bright. The face is what people look at first. If the background blows out, recover highlights with the highlights slider, but don't push it so hard that the bright areas go gray and flat.
Phones and cameras often meter for the whole scene, so a face in a dark room comes out too dark and a face against a bright street comes out too dark as well. Expect to add a third to two-thirds of a stop to the face in both cases, either globally or with a local brush.
4. A gentle curve
Contrast makes a picture feel crisp, but heavy contrast crushes the shadows where the environment lives. Use a gentle S-curve: lower the shadows a touch, lift the highlights a touch. If the shadows look too inky, raise the bottom left point of the curve slightly. This "lifted black" is a common film look, and it keeps the detail of the room visible. Don't overdo it, or the picture will look foggy.
Keep saturation low. If colors look dull, raise vibrance by a small amount instead. Vibrance mostly boosts the muted colors and protects skin tones.
5. Local light instead of blur
Your eye should go to the face first. If it doesn't, guide it with light, not with fake blur. Use a radial filter or brush to brighten the face slightly (a quarter of a stop is plenty), and darken distracting bright areas at the edges. A soft vignette helps, but if you notice it, it's too strong.
Adding background blur in software rarely looks right in environmental portraits, because the edges of hair and objects give it away, and blurring the place defeats the point.
6. Retouch lightly
Remove things that are temporary: a spot, a scratch, a stray hair across the eye, a crumb on a shirt. Leave things that are permanent: freckles, scars, wrinkles, the shape of a nose. Use a spot-healing brush at small sizes instead of a global smoothing slider. Clarity and texture sliders should stay near zero for skin; a small negative value is the most you need.
If you are unsure, ask the subject. Most people are happy for you to remove a blemish. Very few want their face reshaped, and on a street portrait it is not your call to make.
7. Compare, then rest
Toggle the before and after. Zoom to 100% on the eyes and skin to check for halos, banding or over-sharpening. Then step away. After a break of ten minutes or more, edits that felt subtle often look heavy, and you'll pull a few sliders back.
Making a set match
If you're posting more than one image from a shoot (for example, a wide, a medium and a detail in a single post), they should look like they belong together. Edit the strongest frame first, copy its settings to the others, and then adjust exposure and white balance individually. Matching color temperature and contrast across a set matters more than any single adjustment.
Exporting for X
Export a JPEG in sRGB color space. X recompresses uploads, so very large files don't help much. A long edge of about 2,000 to 4,000 pixels is plenty. Most editors can strip metadata on export; in Lightroom Classic, for example, the export dialog has a Metadata section where you can choose to remove person and location info. Use it, especially for portraits made at someone's home. The sharing guide covers the rest of the posting checklist.
What not to do
Avoid presets that change everything at once, dramatic sky replacements, heavy grain, teal-and-orange grading, and face reshaping tools. They might get attention in the feed, but the portrait stops being about the person and becomes about the edit. The people you photograph will notice, and so will everyone who knows them.
Questions
How much skin smoothing is too much?
If pores and fine lines disappear, it is too much. Remove temporary things like spots, a stray hair or a smudge, and leave the texture of the skin alone. Ask yourself whether the person's friends would recognize them instantly.
Should I edit a portrait in black and white?
It can work well for environmental portraits with messy or mixed color, especially at night. Convert after you have set exposure and contrast, and adjust the individual color channels so skin does not turn gray or muddy.